Many a time as a normal PC users we face the challenge of making a video that shows what we are doing on our own screen. While making any guide or tutorial or simply recording the latest game that you are playing you need to record what’s happening on your screen and more often than not it becomes a tedious task for people who don’t want to use a different software or a complicated tool.
So today we will tell you how to record your screen on Windows using a VLC media player and without installing any other add-on or tool. One of the added benefits of using a VLC media player is that the resultant file has a really small size as compared to other screen recording tools.
Table of Contents
How to record screen on Windows using VLC: The Steps.
- Open up your VLC media player application from your Start menu or shortcut icon on the desktop.
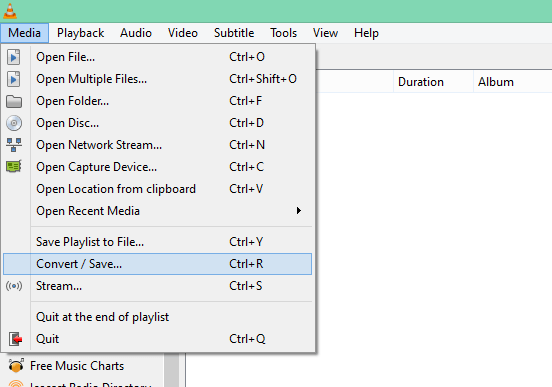
- Now click on the “Convert/Save” option in the “File” menu.

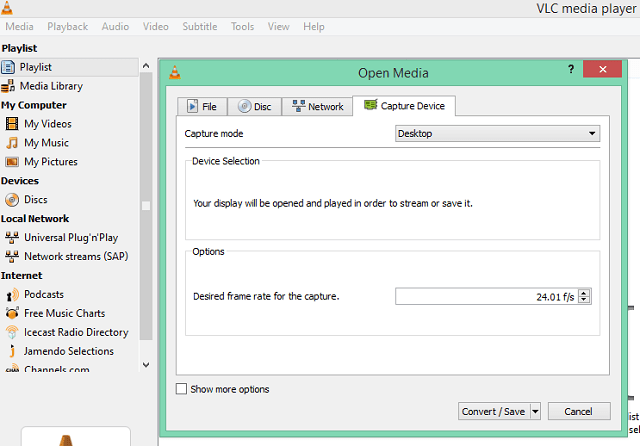
- Now in the new window that opens click on the “Capture Device” tab.
See more: How to restore your site from Google’s website cache
- Now in capture mode of the VLC media player select the option “Desktop” and then select the frame rate that you want for your video, The higher the frame rate the more the size of the video, and the more will be smoothness in the video. Be sure not to select a frame rate of less than 24 for a seamless video experience. Lower frame rates would give you lower file size but not-so-smooth videos.

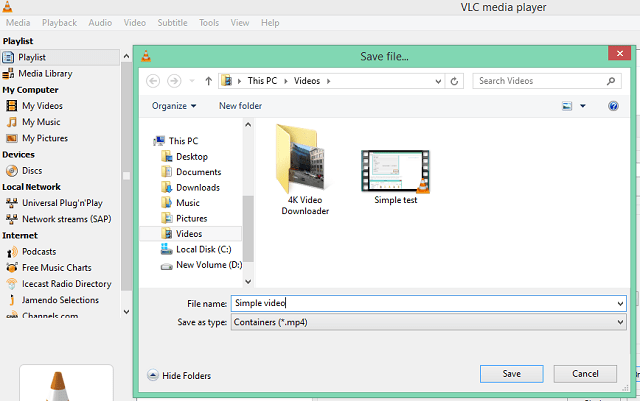
- Now select your destination in the next tab and select where the recorded file would be saved along with the output container. You can choose H.264+ Mp3 for video and audio codecs in an MP4 container format but you can also choose .webm format for amazing clarity in small video size. VP80 + Vorbis are the video and audio codecs in Webm videos and they are the same video codecs and the same format used by YouTube for online video streaming.

Choose the Destination and the file name and then click on “Save”. - Click on the “Start” button now to start the recording and on “Stop” when you want to stop the recording.
- Now head over to the destination folder where your video file was saved and now you can view it or edit it using some tool of your liking, hence Your desktop screen’s video is now made and you can do anything that you like with it.
So this was our tutorial post on how to record screens on videos using a VLC media player. You can find the full tutorial in the below video for ease of understanding.
We wish you an awesome blogging journey. Stay Inspired to rise folks! This post was made possible by a prior guide written by Ashwani Kumar Singh from Iocreed.com!
Keep visiting for more awesome how-to guides, gadget reviews, and tech news, and remember we cover,
“Everything under the Sun!”

Follow Inspire2rise on Twitter. | Follow Inspire2rise on Facebook. | Follow Inspire2rise on Google+.
Stay Inspired to rise fellas!
Read more:
- How to improve font legibility through custom CSS
- How to maintain image quality when posting on Facebook
- How to pin a post to the homepage in WordPress
- How to get thumbnails from a YouTube video
Discover more from Inspire2Rise
Subscribe to get the latest posts sent to your email.


Hey Aditya,
That’s a great article. I use VLC always to watch movies but never knew that we can also record the screen and save it. Thanks for showing me the way as it is going to help me a lot and save a lot of time.
Thanks again!
Thanks a lot Arbaz bro, this is surely a very handy trick and can be used by anyone to record their screen! Keep visiting Inspire2rise.com for more bro! 🙂
Hello,
thanks for this awesome article. I never knew that we can also use VLC media player to record our desktop screen. Thanks a lot for this, Aditya!
For sure man, it’s an awesome method to make videos of what you are doing on your screen. Keep visiting Inspire2rise.com for more awesome stuff! 😀
special thanks to author. Being a smartphone user, i always wonders for this kind of tricky post and useful internet tips.
I worked for me and quite amazingly works.
Special thanks!
I really appreciate you providing the information on how to record the screen, this blog will certainly reduced the searching time about the issue